
The year is 2010. Minecraft has just released its first beta version. I am frantically trying to figure out how to run a Minecraft server on my parents' computer so that I can play the game with my friends, asking Google all kinds of questions in a desperate attempt to figure out what “port forwarding” is.
This situation served as a harsh introduction to networking concepts, as well as the command line interface and the Java VM. In the many years since then, I’ve revisited the problem of setting up a dedicated game server over and over. After learning about cloud computing, I saw how the cloud would be a perfect fit for hosting a dedicated game server.
In this post, I’ll endeavor to show you the cloud-based solution I arrived at after years of searching for the best way to host a game server. Although I initially set out to make a Minecraft server, this approach is applicable for any game.
Design Considerations
The most important requirement for our server is that it needs to be functional: a player should be able to connect to the server with their game client and interact with other players who are also connected. To fulfill this requirement, our server necessarily has to be exposed to the internet, which is inherently risky. If an exploit is discovered in the game server that allows for remote code execution, our entire computer could be compromised. This situation sounds farfetched, but it has happened; the infamous log4j exploit affected all previous versions of Minecraft: Java Edition. To mitigate risk, we should use a dedicated server instead of trying to run the server on a personal PC.
Our server should also be available. This requirement is another very good reason to use a dedicated server; if we were to run our server on a personal PC, the server would be inaccessible whenever the PC was turned off.
Finally, our server should balance performance with cost. Our dedicated server should have enough resources to avoid lag. At the same time, we’d like to spend as little money on this server as possible. One major consideration for cost is that server providers will bill you for the amount of time a server is running, so to further minimize cost, the server should be on-demand. The server only needs to be running when players are connected, so it should automatically shut itself off when nobody is playing to save money. Players should have an easy way to start the server back up when they want to log back in.
A cloud provider should be able to fulfill all these requirements for our server. The selling point of cloud computing is that you only pay for what you use, which nicely fits with our need to balance performance and cost. Also, it’s easy to start and stop virtual machines (or “instances”) on-demand. I’ll be using AWS throughout this tutorial, but the general approach is applicable to other cloud providers.
Server Setup
To begin, we’ll sign up with AWS. After the sign-up process is complete, we’re able to access the landing page for the AWS console. From here, we’ll jump right to procuring a dedicated server.
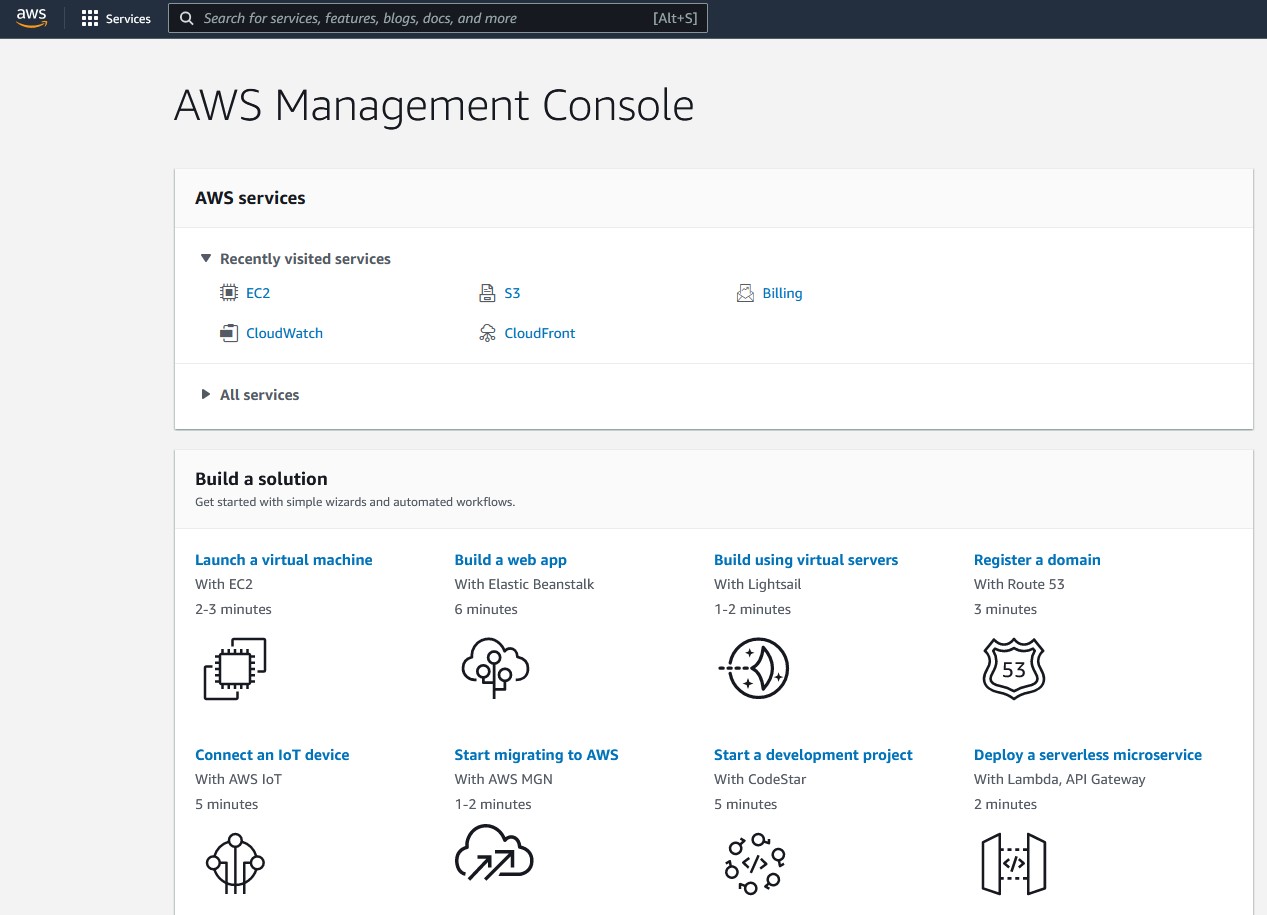
Create EC2 Instance
From the AWS console, click on “Launch a Virtual Machine with EC2,” and then follow the ensuing steps:
- Choose AMI: For our operating system, AWS recommends Amazon Linux. Your needs may differ depending on which type of server you are hosting, but for a Minecraft server, the default Amazon Linux AMI will suit our needs.
- Choose Instance Type: These instance types each have different quantities of computing power. You’ll want to choose an instance type that suits the performance requirements of your server. My unmodded Minecraft server is running on a
t2.mediuminstance type. - Configure Instance: These options can be left at their defaults.
- Add Storage: This page will be pre-populated with an existing data volume that the instance will use. Leave this volume as-is, but create a new volume to store the data for the dedicated server. The size of the volume will differ depending on the requirements for your server; for an unmodded Minecraft server I’ve found 10 GB of storage is sufficient. The advantage of storing the server data on a seperate volume is that if you decide to change the instance type later, the instance can be safely deleted and the volume can be re-attached to a new instance. Later, we will configure this new volume to automatically mount to our instance when it starts up.
- Add Tags: These options can be left at their defaults.
- Configure Security Group: This page is where we can define precisely how our new instance is exposed to the wider internet. As a default, port
22should be open so that we can connect to the instance via the SSH protocol, allowing us to perform additional configuration later. However, you’ll also want to add a new rule that allows game clients to access the instance in the expected way. For instance, a Minecraft server would conventionally require a TCP rule for port25565. - Review: Verify that the instance details meet your expectations, then click “Launch” to start your new instance.
After launching the instance, you’ll be presented with a keyfile to save. Put this file in a secure location; we’ll need it shortly to connect to the running instance via SSH.
Use any SSH client (PuTTY on Windows) to connect to your new instance. You’ll need to provide the keyfile that was saved earlier, as well as the IP address of the instance and your instance’s default username. Once you are connected to the instance, the first order of business will be to mount the volume that was created earlier.
Mount Volume
First, use the lsblk command to list all available volumes. Identify the additional volume we created earlier (by looking for its size). From there, this new volume can be mounted with the following command:
sudo mount /dev/xvdf /<volume_name>/
Note: if the device name is not /dev/xvdf, substitute the correct device name. Likewise, change /<volume_name>/ to your desired directory name.
To verify that the volume was successfully mounted, cd into the mounted volume:
cd /<volume_name>/
Since we’re expecting the instance to be stopping and starting repeatedly, we’ll set the volume to automatically mount. We’ll accomplish this by adding an entry to the /etc/fstab file. This file governs which disks are mounted to the instance when it boots.
Your entry in the /etc/fstab file will require the “universally unique identifier” (or UUID) of your volume, which can be found by running the blkid command. For a Minecraft server, my /etc/fstab entry looks like this:
UUID=ee691354-7a18-429d-925c-b9fcc67896f1 /minecraft xfs defaults,nofail 0 2
For more information on the /etc/fstab file, check this article.
To verify that the /etc/fstab file is working as expected, restart your instance with sudo reboot and verify that you’re able to access the mount directory after the instance restarts.
Server Configuration
Now that the volume is attached, we will install the game server. Move to the mount directory and install the executables for your game server. For a Minecraft: Java Edition server, you’ll have to install the Java Runtime Environment:
sudo apt install openjdk-17-jdk
Note: the above command installs version 17 of OpenJDK, which is the latest version at the time of writing. You may need to modify the above command to ensure that you are installing the latest version.
After confirming that the java --version command works, download the server .jar file (link) and verify that you can run the server from the command line:
java -Xmx1024M -Xms1024M -jar minecraft_server.jar nogui
While the server is running, you may also wish to verify that you can connect to the server with your client.
Upon running the server in this way, you’ll note that the server takes up the entire terminal window with no option to execute more commands. To get around this issue, we’ll run the server in a screen:
screen -DmS minecraft java -Xmx1024M -Xms1024M -jar minecraft_server.jar nogui
After running this command, the server can be put into the background with Ctrl + A then D, allowing us to continue entering Linux commands. If we ever need to run server commands, we can return the server to the foreground with screen -r minecraft.
We want this command to run automatically whenever the instance boots, so we will create a new service in systemd. systemd is one of the Linux programs responsible for determining which programs run at boot.
Processes in Linux inherit the permissions of the user that run them. The default administrative user, root, has all permissions to the system. In case the service is compromised, we’d like to avoid giving an attacker permission to run amok in our entire instance, so instead of running the server as the root user, so we’ll create a new user:
adduser <user_name>
We’ll also give ownership of our system volume to this new user:
chown -R <user_name> /<volume_name>/
Navigate to the /etc/systemd/system directory and create a new <server_name>.service file in that directory. The systemd unit file format has too many options to cover here, but I’ll provide my current systemd file to use as a template. Here is what my minecraft.service file looks like:
[Unit]
Description=Minecraft server
After=network.target

[Service]
WorkingDirectory=/minecraft/1_18
User=mc_user
ExecStart=/usr/bin/screen -DmS minecraft /usr/bin/java -Xms1024M -Xmx3072M -XX:+UseG1GC -jar server.jar nogui
KillMode=none

[Install]
WantedBy=default.target
For more information on systemd unit files, check this article.
After creating the service file, we can start the service manually:
systemctl start <server_name>
To access the screen and run commands on our server while it is running as a service, you’ll need to switch to the service user we created:
su <user_name>
screen -list
To configure the service to automatically run when the instance is booted, use the following command:
systemctl enable <server_name>
Try rebooting the instance and verify that the server starts up as expected. You should be able to connect to your instance with your client after the server reboots with no manual intervention.
Auto Shutdown
Now that our server is running once the instance starts, we’ll perform some administrative tasks in the AWS console to automatically shut off our instance once it falls below a certain threshold of activity.
Ideally, we’d like to read some data from the game to determine when the server should turn off. For instance, if there have been 0 players connected to the server for the last 15 minutes, the server should shut off. Unfortunately, that information is not easily exposed to AWS, which comes with strict limitations on the criteria you can use to automatically act upon instances.
As an alternative solution, we’ll look at the CPU usage of the instance and turn the instance off once it meets a certain threshold. If there are no players on the server, then CPU usage should remain low. We could also use a different metric to determine when to turn off the server; for instance, if there are no players on the server then network traffic will be low as well.
Navigate to AWS CloudWatch in the AWS web console and perform the following steps:
- Click “Create Alarm”
- Click “Select Metric”
- Click “EC2,” then “Per-Instance Metrics”
- Identify the instance name and ID, and select the “
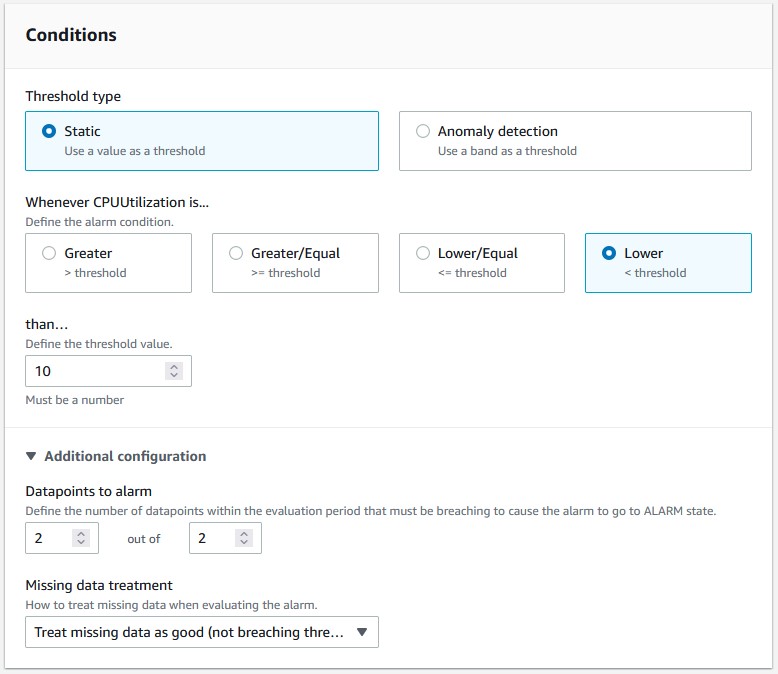
CPUUtilization” metric for that instance. A graph will appear charting that metric over time. - Set the alarm condition to trigger whenever the
CPUUtilizationmetric is lower than 15%. (Note: this percentage value will differ depending on the type of server you are running. Monitor the CPU usage while connected to and disconnected from your server to experimentally determine what the threshold value should be.) Also, ensure the following settings are selected:- Datapoints to alarm: 2 of 2 (Only shut the instance off when CPUUtilization remains low for an extended period of time)
- Missing data treatment: Treat missing data as good (not breaching threshold)
Click on “Next,” then click “Remove” on the default “Notification” action (since we don’t need to be notified whenever the server shuts off). Instead, click “Add EC2 Action” and then click “Stop this instance.” Finally, specify a name and description for your new CloudWatch alarm.
The CloudWatch alarm is now configured to automatically shut off the instance during periods of low activity.
On-Demand Startup
Our final requirement is to provide an on-demand way for prospective players to start the server.
Lambda
We’ll write a small AWS Lambda function that takes an EC2 instance ID and starts that instance. Our function will also return some data about the status of the started instance. In particular, we’d like to return a different value for each of the following 3 cases:
- An error occurred and the instance was not able to start
- The instance started successfully
- The instance was already running when the request to start it was sent
We’ll write our Lambda in Node.js. Here is the code for this Lambda function:
const AWS = require('aws-sdk');
const ec2 = new AWS.EC2();

// HTTP response code for this Lambda
const RESPONSE_CODE = 200;

// Return values for the 3 possible cases when starting an instance
const INSTANCE_NOT_STARTED = 0;
const INSTANCE_STARTED = 1;
const INSTANCE_ALREADY_RUNNING = 2;

// top-level handler function for this Lambda
exports.handler = async (event) => {
    let startInstancesResponseBody = await startInstance(event.instanceId);
    let lambdaResponseBody = transformResponseBody(startInstancesResponseBody);
    return makeResponse(lambdaResponseBody);
};

// start the instance with the specified ID
async function startInstance(instanceId) {
    return await ec2.startInstances({
       InstanceIds: [instanceId]
    }).promise();
}

// transform the results from ec2.startInstances into the response body for our Lambda
function transformResponseBody(responseBody) {
    let startedInstance = responseBody.StartingInstances[0];
    let code = INSTANCE_NOT_STARTED;
    if (startedInstance.CurrentState.Name == "pending") {
        code = INSTANCE_STARTED;
    }
    else if (startedInstance.PreviousState.Name == "running") {
        code = INSTANCE_ALREADY_RUNNING;
    }
    return { startCode: code };
}

// build our Lambda's response
function makeResponse(responseBody) {
    return {
        statusCode: RESPONSE_CODE,
        body: JSON.stringify(responseBody)
    };
}
After creating the Lambda, ensure its corresponding role has the permission for starting up EC2 instances. Once the Lambda is deployed, verify its functionality with a test event like the following:
{
    "instanceId": "i-00b1c7baf42e853de"
}
API Gateway
The next step is to expose this Lambda to the wider internet. To accomplish this goal, we’ll use AWS API Gateway.
Create a new REST API from the API Gateway Dashboard, then create a new /start resource (enabling CORS in the process). Create a POST method on this new resource. When prompted about integrating a Lambda function, select the Lambda function we deployed earlier (but leave the “Lambda Proxy Integration” checkbox unchecked).
It’s useful for our Lambda to be able to accept an arbitrary instance ID, in case we want to reuse this Lambda for another server later. However, we don’t want users to be able to specify arbitrary instance IDs. To that end, we will supply the instance ID as a stage variable. Stage variables can only be changed by editing the configuration in API Gateway, meaning users will not be able to access or modify the instance ID.
Once the /start resource and POST method are created, navigate to the Integration Request section of the method. Under “Mapping Templates,” add a new mapping template for the application/json Content-Type, and populate it with the following template:
{
  "instanceId": "$stageVariables.InstanceId"
}

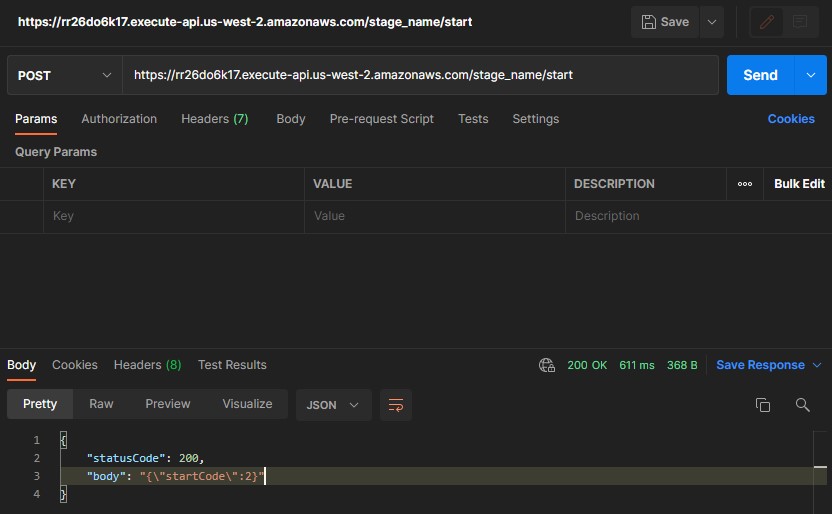
This template will supply the InstanceId stage variable to the instanceId key of the Lambda when this API method is invoked. Create a new stage, and specify the instance ID as an InstanceId stage variable. Finally, deploy the API endpoint to the stage.
Once the stage is deployed, you should be able to test your new API with the AWS-supplied URL using curl or Postman:
Website
The final step of exposing this functionality to users is to host a link to this API on a public-facing website. There are lots of possibilities for website hosting, but I use an AWS S3 static website. The only real requirement is that your website should have a button that invokes the API endpoint when clicked, and then displays some feedback to the user depending on the endpoint’s return value.
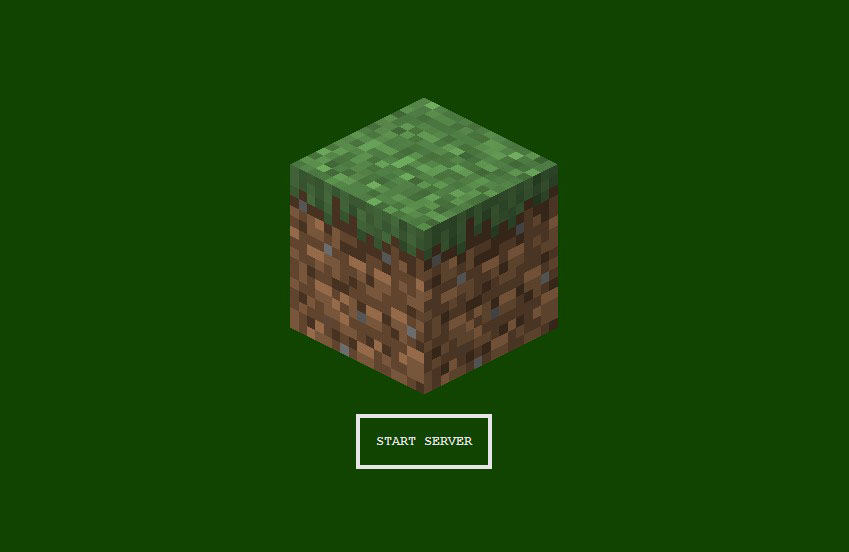
Once the website is ready, you can share the page URL with your players, any of whom will be able to click the button and start up your server at a moment’s notice.
Final Thoughts
Users have an intuitive experience with this architecture: when a user wants to log onto your server, they’ll go to your website and click the button to start it. After waiting a few seconds for the server to start up, they’ll be able to log on with their client.
The configuration outlined in this post has been refined over many years, and will likely continue to evolve and improve. The process of setting up all these systems is quite advanced, but the reward is that the server can be hosted for a much lower cost than normal (because you’re only billed for the time the instance is running). Cloud computing is a perfect fit for dedicated servers, and I hope this guide will prove useful for anyone seeking to follow in my footsteps.
Acknowledgements
- Laura McLean (for proofreading and editing)